Resources
Featured

How to Build a Blog Subscription Wall with Clerk and ContentLayer for Your MDX Blog

In this article, we will build a subscription wall for your MDX blog using Clerk, an easy-to-use auth provider, and integrate it into our blog using MDX and ContentLayer.

Felix Vemmer
Felix Vemmer
April 9, 2024
How to Build a Blog Subscription Wall with Clerk and ContentLayer for Your MDX Blog

I began this blog on Ghost, a popular blogging platform. A standout feature of Ghost that I appreciated is the option to share some content publicly and keep other content private for subscribers.

Ghost subscription wall

After moving to my custom blog using Next.js and MDX through ContentLayer, I aimed to include a subscription wall to begin growing my audience.

blog cover

The Rise of Next.js: Why It's the Full-Stack Framework of Choice for Modern Websites

When selecting a frontend framework, reliability is paramount for my clients. Despite exploring options like SvelteKit, "Why Next.js?" remains a frequent query. In this article, I unpack why Next.js stands out as a dependable choice and its promising future.

November 1, 2023

After announcing the launch in a tweet, here is the complete guide on creating a subscription wall for your MDX blog using Clerk.

Setting Up Clerk

To secure access to my blog, I chose Clerk because it's a simple and intuitive authentication provider that works very well with Next.js. Below, you'll find a post where I compared Clerk to Supabase Auth and delved a bit more into detail on why I prefer Clerk.

blog cover

Supabase vs. Clerk.dev: Comparative Analysis of Auth Tools

Dive into the Supabase vs Clerk.dev debate. Uncover insights about their performance, custom tokens, user impersonation, cost dynamics, and more. Which tool will reign supreme for you?

June 14, 2023

The easiest way to get started with Clerk is to use their Next.js integration.

Since their tutorial is well done, I will not delve into detail on how to set up Clerk. I'll just provide a step-by-step guide on creating a subscription wall.

By the end of following the quickstart, you should have set up Clerk in your Next.js app with the following files:

  • /sign-in/[[...sign-in]]/page.tsx
  • /sign-up/[[...sign-up]]/page.tsx
  • /middleware.ts

Paywall Card Component

The next step is to create a card component that will be shown to the user if they are not logged in.

Google should be able to index this.

Subscription Form Zod Schema

As you can see from the component above, the component is a simple form wrapped in a Card using the amazing shadcnUI library.

By using react-hook-form, we can create a type-safe subscription form with the following fields:

import { z } from 'zod'
 
const SSubscribe = z.object({
  email: z.string().email({
    message: 'Please enter a valid email address',
  }),
  pendingVerification: z.boolean().optional(),
  code: z.string().optional(),
  mode: z.literal('sign-up').or(z.literal('sign-in')).default('sign-up'),
})
 
export type TSubscribe = z.infer<typeof SSubscribe>
  • email: The user's email address
  • pendingVerification: State used for Clerk sign-up/sign-in flow
  • code: The verification code sent to the user's email address
  • mode: The mode of the subscription form, either 'sign-up' or 'sign-in'

We can then instantiate the form and build out the form fields inside the card.

  const form = useForm<TSubscribe>({
    resolver: zodResolver(SSubscribe),
    defaultValues: {
      email: '',
      pendingVerification: false,
      code: '',
      mode: 'sign-up',
      newsletter: true,
    },
  })

Subscription Form UI

For the UI, depending on the mode and sign-up/sign-in state, we render either a sign-up, sign-in, or verification code form.

If the user has signed up or signed in, we display a verification code form where the user can enter the verification code that was sent to their email address.

  if (form.watch('pendingVerification')) {
    return (
      <>
        <Card className="my-12 flex flex-col items-center">
          <CardHeader>
            <CardTitle>Enter verification code</CardTitle>
          </CardHeader>
          <CardContent>Enter the verification code which was sent to your email.</CardContent>
          <CardFooter className="gap-0">
            <Form {...form}>
              <form
                onSubmit={form.handleSubmit(onVerify)}
                className="flex flex-col sm:flex-row gap-2"
              >
                <FormField
                  control={form.control}
                  name="code"
                  render={({ field }) => (
                    <FormControl>
                      <InputOTP {...field} maxLength={6}>
                        <InputOTPGroup>
                          <InputOTPSlot index={0} />
                          <InputOTPSlot index={1} />
                          <InputOTPSlot index={2} />
                        </InputOTPGroup>
                        <InputOTPSeparator />
                        <InputOTPGroup>
                          <InputOTPSlot index={3} />
                          <InputOTPSlot index={4} />
                          <InputOTPSlot index={5} />
                        </InputOTPGroup>
                      </InputOTP>
                    </FormControl>
                  )}
                />
                <Button type="submit">
                  {form.formState.isSubmitting ? (
                    <Loader2Icon className="animate-spin mr-2 size-4" />
                  ) : null}
                  Verify
                </Button>
              </form>
            </Form>
          </CardFooter>
        </Card>
      </>
    )
  }

Otherwise we render a sign-up or sign-in form, depending on the mode state.

return (
  <>
    <Card className="my-12 flex flex-col items-center">
      <CardHeader>
        <CardTitle>
          {form.watch('mode') === 'sign-up'
            ? 'Subscribe to continue reading.'
            : 'Sign in to continue reading.'}
        </CardTitle>
      </CardHeader>
      <CardContent>
        {form.watch('mode') === 'sign-up'
          ? 'Become a free member to get access to all subscriber-only content.'
          : 'Enter your email to sign in and continue reading.'}
      </CardContent>
      <CardFooter>
        <Form {...form}>
          <div className="flex flex-col items-center">
            <form onSubmit={form.handleSubmit(onSubmit)}>
              <div className="flex flex-col sm:flex-row gap-2">
                <FormField
                  control={form.control}
                  name="email"
                  render={({ field }) => (
                    <FormItem>
                      <FormControl>
                        <Input className="w-60" placeholder="" type="email" {...field} />
                      </FormControl>
                      <FormMessage />
                    </FormItem>
                  )}
                />
                <Button type="submit">
                  {form.formState.isSubmitting ? (
                    <Loader2Icon className="animate-spin mr-2 size-4" />
                  ) : null}
                  {form.watch('mode') === 'sign-up' ? 'Subscribe' : 'Sign in'}
                </Button>
              </div>
            </form>
            <FormDescription className="pt-2">
              Already a reader?{' '}
              <Button
                className="p-0"
                onClick={(e) => {
                  e.preventDefault()
                  const value = form.watch('mode') === 'sign-in' ? 'sign-up' : 'sign-in'
                  form.setValue('mode', value)
                }}
                variant={'link'}
              >
                {form.watch('mode') === 'sign-in' ? 'Sign up' : 'Sign in'}
              </Button>
            </FormDescription>
          </div>
        </Form>
      </CardFooter>
    </Card>
  </>
)

Subscription Form Handlers

Finally, we need to handle the form submission when a user tries to sign up/sign in or enters the verification code. For each route, I created two separate functions onSubmit and onVerify.

Sign Up/In Handler

  1. First, we check if the sign-up or sign-in API is loaded.

  2. If it is, we check if the mode is sign up or sign in and handle the sign-up or sign-in flow accordingly.

  3. After the sign-up or sign-in flow is complete, we set the pendingVerification state to true and show the verification code form.

async function onSubmit(values: TSubscribe) {
  if (!isLoadedSignUp) {
    return
  }
 
  if (values.mode === 'sign-up') {
    try {
      await signUp.create({
        emailAddress: values.email,
      })
 
      await signUp.prepareEmailAddressVerification({ strategy: 'email_code' })
 
      form.setValue('pendingVerification', true)
      toast.success('Please enter the verification code which was sent to your email.')
    } catch (err: any) {
      const message = err?.errors[0]?.message || 'There was an error subscribing.'
      toast.error(message)
      console.error(JSON.stringify(err, null, 2))
    }
  } else {
    if (!signIn) return
 
    try {
      const si = await signIn.create({ identifier: values.email })
 
      const firstFactor = si.supportedFirstFactors.find(
        (ff) => ff.strategy === 'email_code' && ff.safeIdentifier === values.email,
      ) as EmailCodeFactor
 
      await si.prepareFirstFactor({
        emailAddressId: firstFactor.emailAddressId,
        strategy: firstFactor.strategy,
      })
 
      form.setValue('pendingVerification', true)
    } catch (err: any) {
      const message = err?.errors[0]?.message || 'There was an error signing in.'
      toast.error(message)
      console.error(JSON.stringify(err, null, 2))
    }
  }
}

Verify Handler

  1. First, we check if the sign-up or sign-in API is loaded.
  2. If it is, we check if the mode is sign-up or sign-in and handle the sign-up or sign-in flow accordingly.
  3. If the completeSignUp.status === 'complete', we set an active session for the user.
const onVerify = async (values: TSubscribe) => {
  if (!isLoadedSignUp) {
    return
  }
 
  if (!values.code) {
    toast.error('Please enter the verification code sent to your email.')
    return
  }
 
  if (form.watch('mode') === 'sign-up') {
    try {
      const completeSignUp = await signUp.attemptEmailAddressVerification({
        code: values.code,
      })
      if (completeSignUp.status !== 'complete') {
        /*  investigate the response, to see if there was an error
        or if the user needs to complete more steps.*/
        console.log(JSON.stringify(completeSignUp, null, 2))
      }
      if (completeSignUp.status === 'complete') {
        await setActive({ session: completeSignUp.createdSessionId })
 
        return
      }
    } catch (err: any) {
      const message = err?.errors[0]?.message || 'There was an error verifying your email code.'
      toast.error(message)
      console.error(JSON.stringify(err, null, 2))
      return
    }
  } else {
    if (!signIn) return
 
    if (!values.code) {
      form.setError('code', {
        message: 'Please enter the verification code sent to your email.',
      })
      return
    }
 
    try {
      // Use the code provided by the user and attempt verification
      const completeSignIn = await signIn.attemptFirstFactor({
        strategy: 'email_code',
        code: values.code,
      })
 
      // This mainly for debuggin while developing.
      // Once your Instance is setup this should not be required.
      if (completeSignIn.status !== 'complete') {
        console.error(JSON.stringify(completeSignIn, null, 2))
        return
      }
 
      // If verification was completed, create a session for the user
      if (completeSignIn.status === 'complete') {
        await setActive({ session: completeSignIn.createdSessionId })
 
        return
      }
    } catch (err: any) {
      const message = err?.errors[0]?.message || 'There was an error verifying your email code.'
      toast.error(message)
      console.error(JSON.stringify(err, null, 2))
      return
    }
  }
}

Protected Content Component

The ProtectedContent component is a simple component that allows us to wrap content that should only be accessible to authenticated users.

import { useContentTeaser } from '@/hooks/use-content-teaser'
import { FC } from 'react'
import ContentTeaser from './content-teaser'
 
export interface ProtectedContentProps {
  children: React.ReactNode
}
export const ProtectedContent: FC<ProtectedContentProps> = ({ children }) => {
  const [showContentTeaser, setShowContentTeaser] = useContentTeaser()
  if (showContentTeaser) return <ContentTeaser />
  return <div>{children}</div>
}

Depending on the showContentTeaser state, we either render a ContentTeaser or the protected content, such as the children.

useContentTeaser Hook

Since we want to show a teaser of the content to the user before they are authenticated, we need a way to modify the showContentTeaser state. For ContentLayer, I did not manage to easily pass props to the ProtectedContent component, so I created a custom hook using Jotai:

use-content-teaser.ts

import { atom, useAtom } from 'jotai'
 
const showContentTeaser = atom(false)
 
export function useContentTeaser() {
  return useAtom(showContentTeaser)
}

ContentLayer Integration

Now that we have the useContentTeaser hook and ProtectedContent component ready, we can include them in our mdx-components.tsx:

  1. Import the useContentTeaser hook and ProtectedContent component.
  2. Add the ProtectedContent component to the components object.
  3. Implement a side effect to check if the user is authenticated or a bot and if not, set the showContentTeaser state to true.
const components = {
  // Other components....
  
  ProtectedContent: ({ ...props }: React.ComponentProps<typeof ProtectedContent>) => (
    <ProtectedContent {...props} />
  ),
}
 
export function Mdx({ code, isBot }: MdxProps) {
  const [config] = useConfig()
  const { isLoaded, isSignedIn } = useAuth()
  const Component = useMDXComponent(code, {
    style: config.style,
  })
 
  const [_, setShowContentTeaser] = useContentTeaser()
 
  useEffect(() => {
    if (isBot) {
      setShowContentTeaser(false)
      return
    }
    if (isLoaded && isSignedIn) {
      setShowContentTeaser(false)
      return
    }
    setShowContentTeaser(true)
  }, [isLoaded, isSignedIn, isBot])
 
  return (
    <>
      <div className="mdx">
        {/* @ts-ignore */}
        <Component components={components} />
      </div>
    </>
  )
}

Protecting Content

Now that we have the ProtectedContent component ready, we can use it to protect our content in any MDX file by simply wrapping the content in the ProtectedContent component.

# Protected Content Dummy Example

Public Content

<ProtectedContent>
  Subscriber Only Content
</ProtectedContent>

SEO Considerations

As you might have noticed from the code above, the ProtectedContent component is not rendered when the request is coming from a bot.

This is important for SEO, as search engines need to be able to see the content of your website so that they can properly index it.

Let's understand how we can check if a request is coming from a bot.

User Agent Check

Well, Next.js makes it super easy to check if a request is coming from a bot.

Simply use the userAgent function in your page.tsx or any other server component, and you will know if a request is coming from a bot.

  const { isBot } = userAgent({
    headers: headers(),
  })

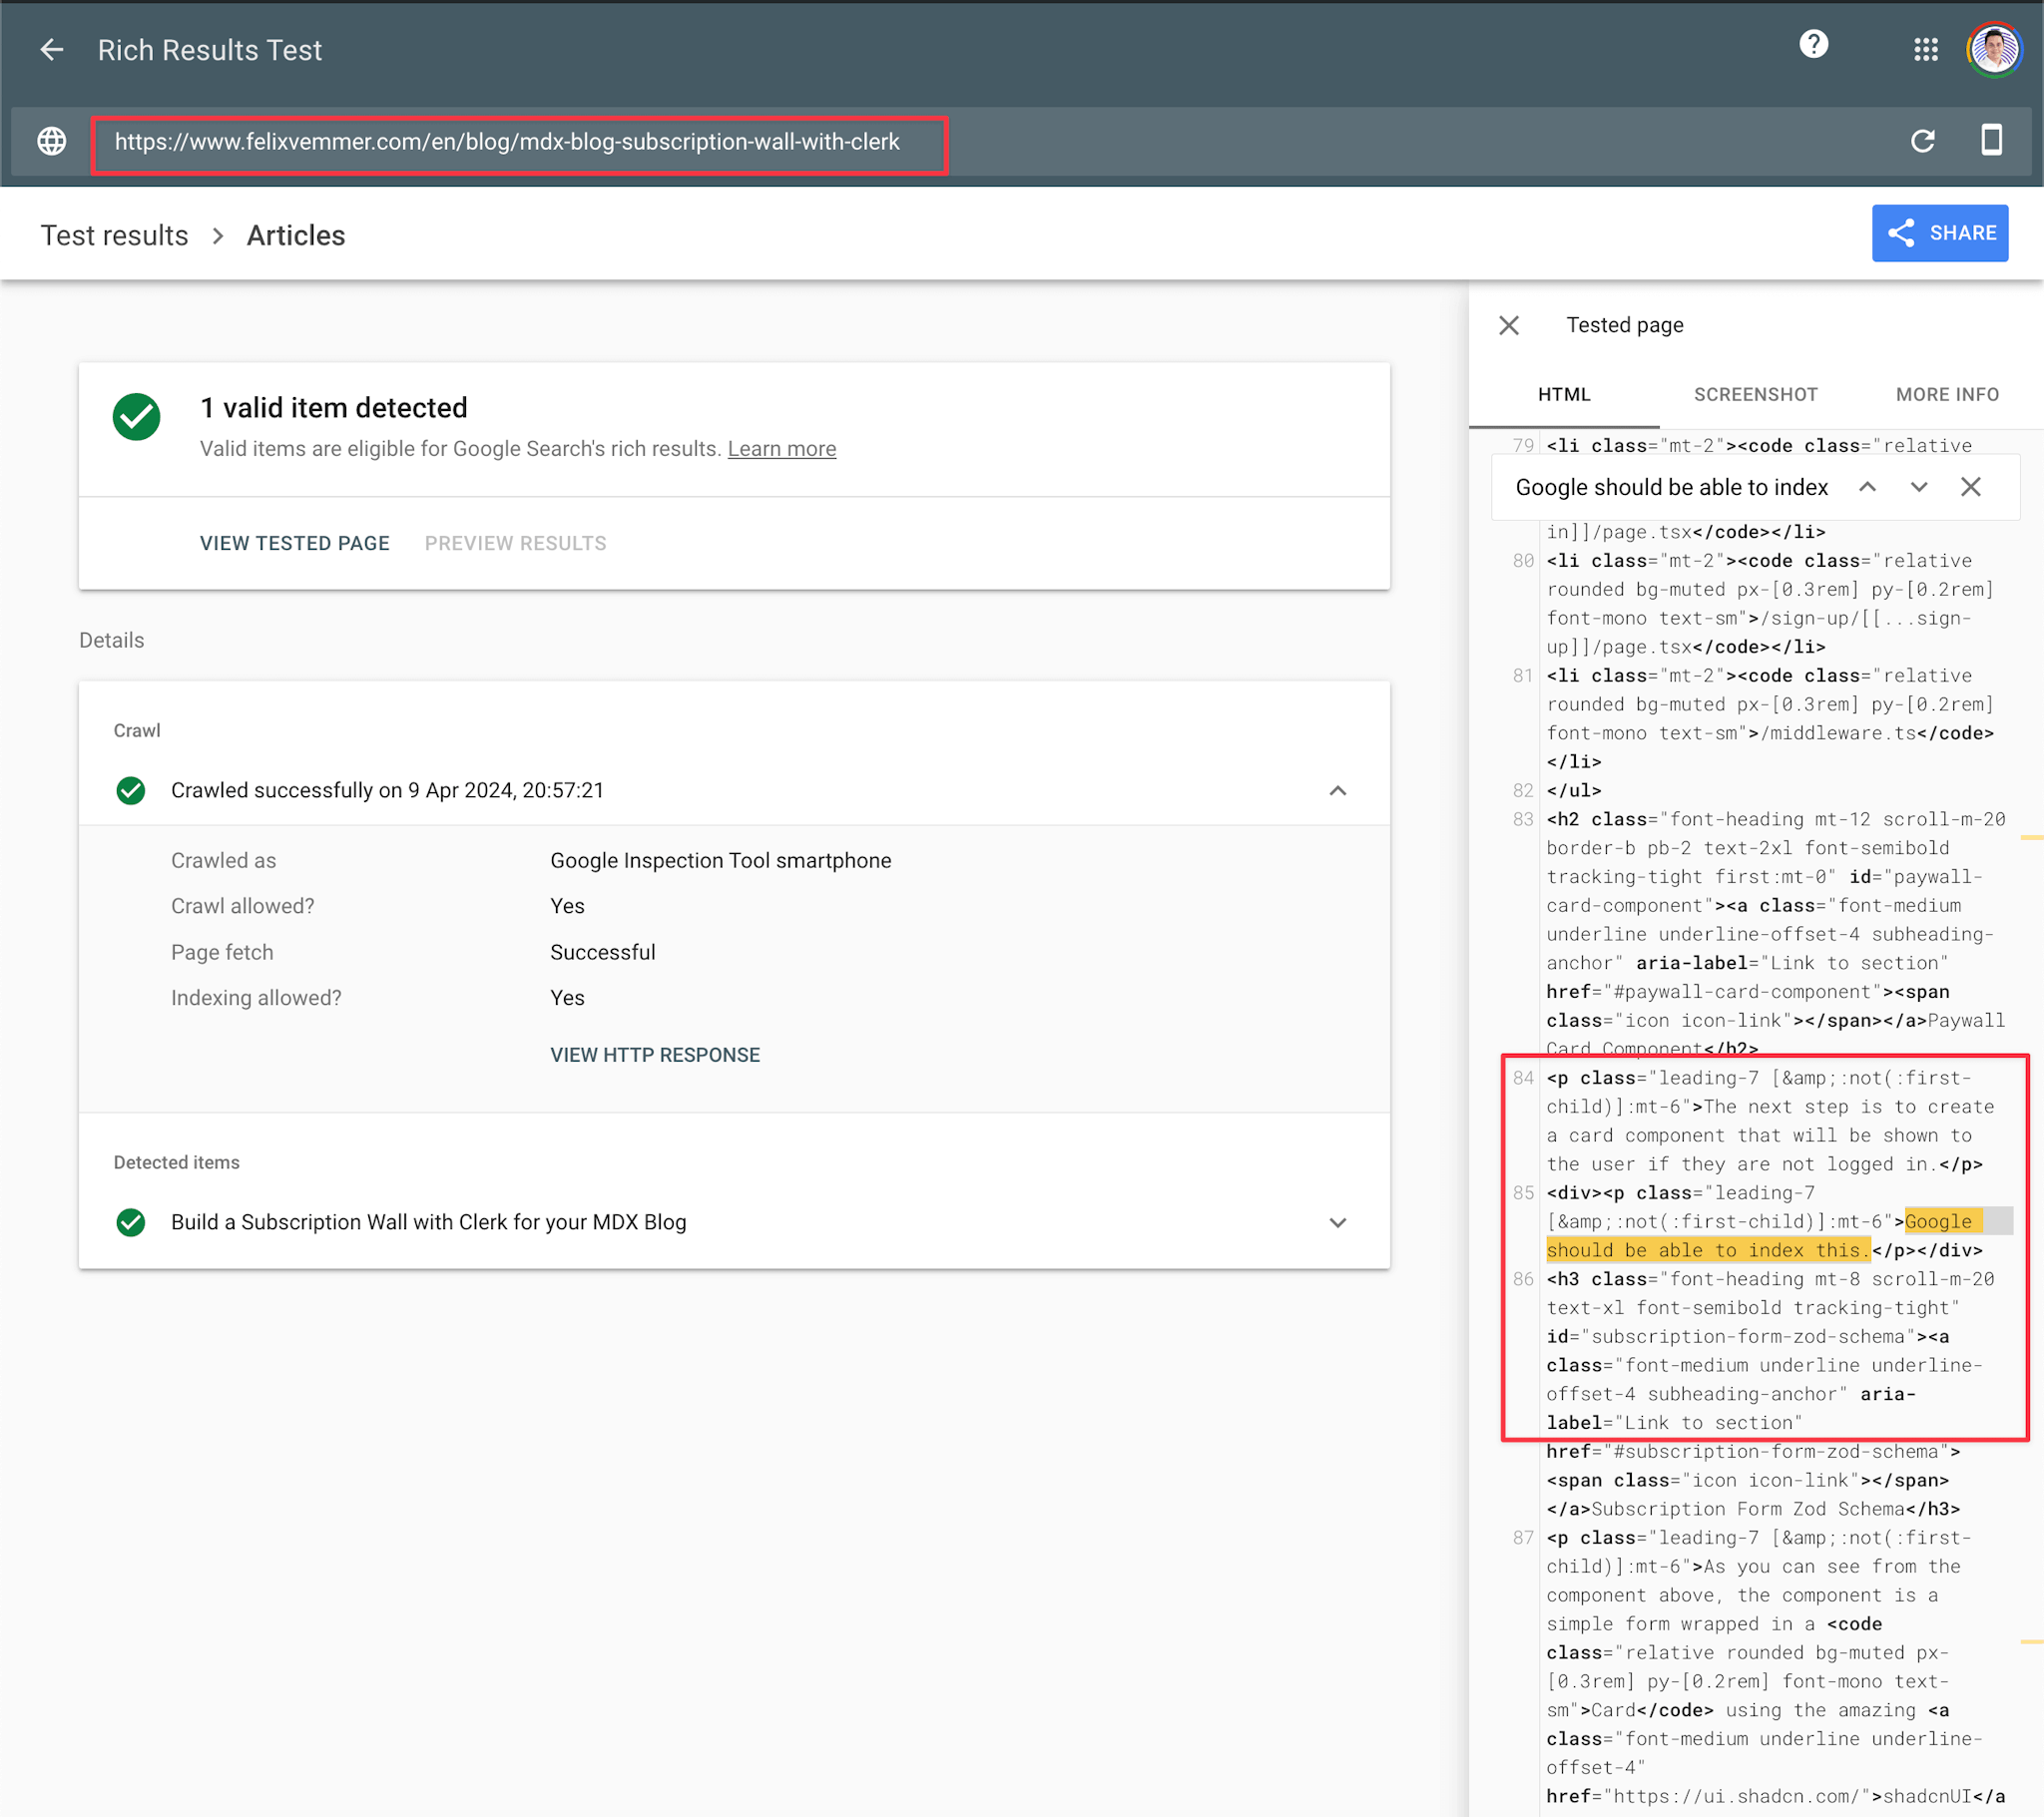
To ensure that this works for Google, you can utilize the Rich Results Test at https://search.google.com/test/rich-results to determine if Google can successfully access your 'ProtectedContent' component.

Testing it on this blog post reveals that I could view the protected content:

Google ought to index this.

within this ProtectedContent component.

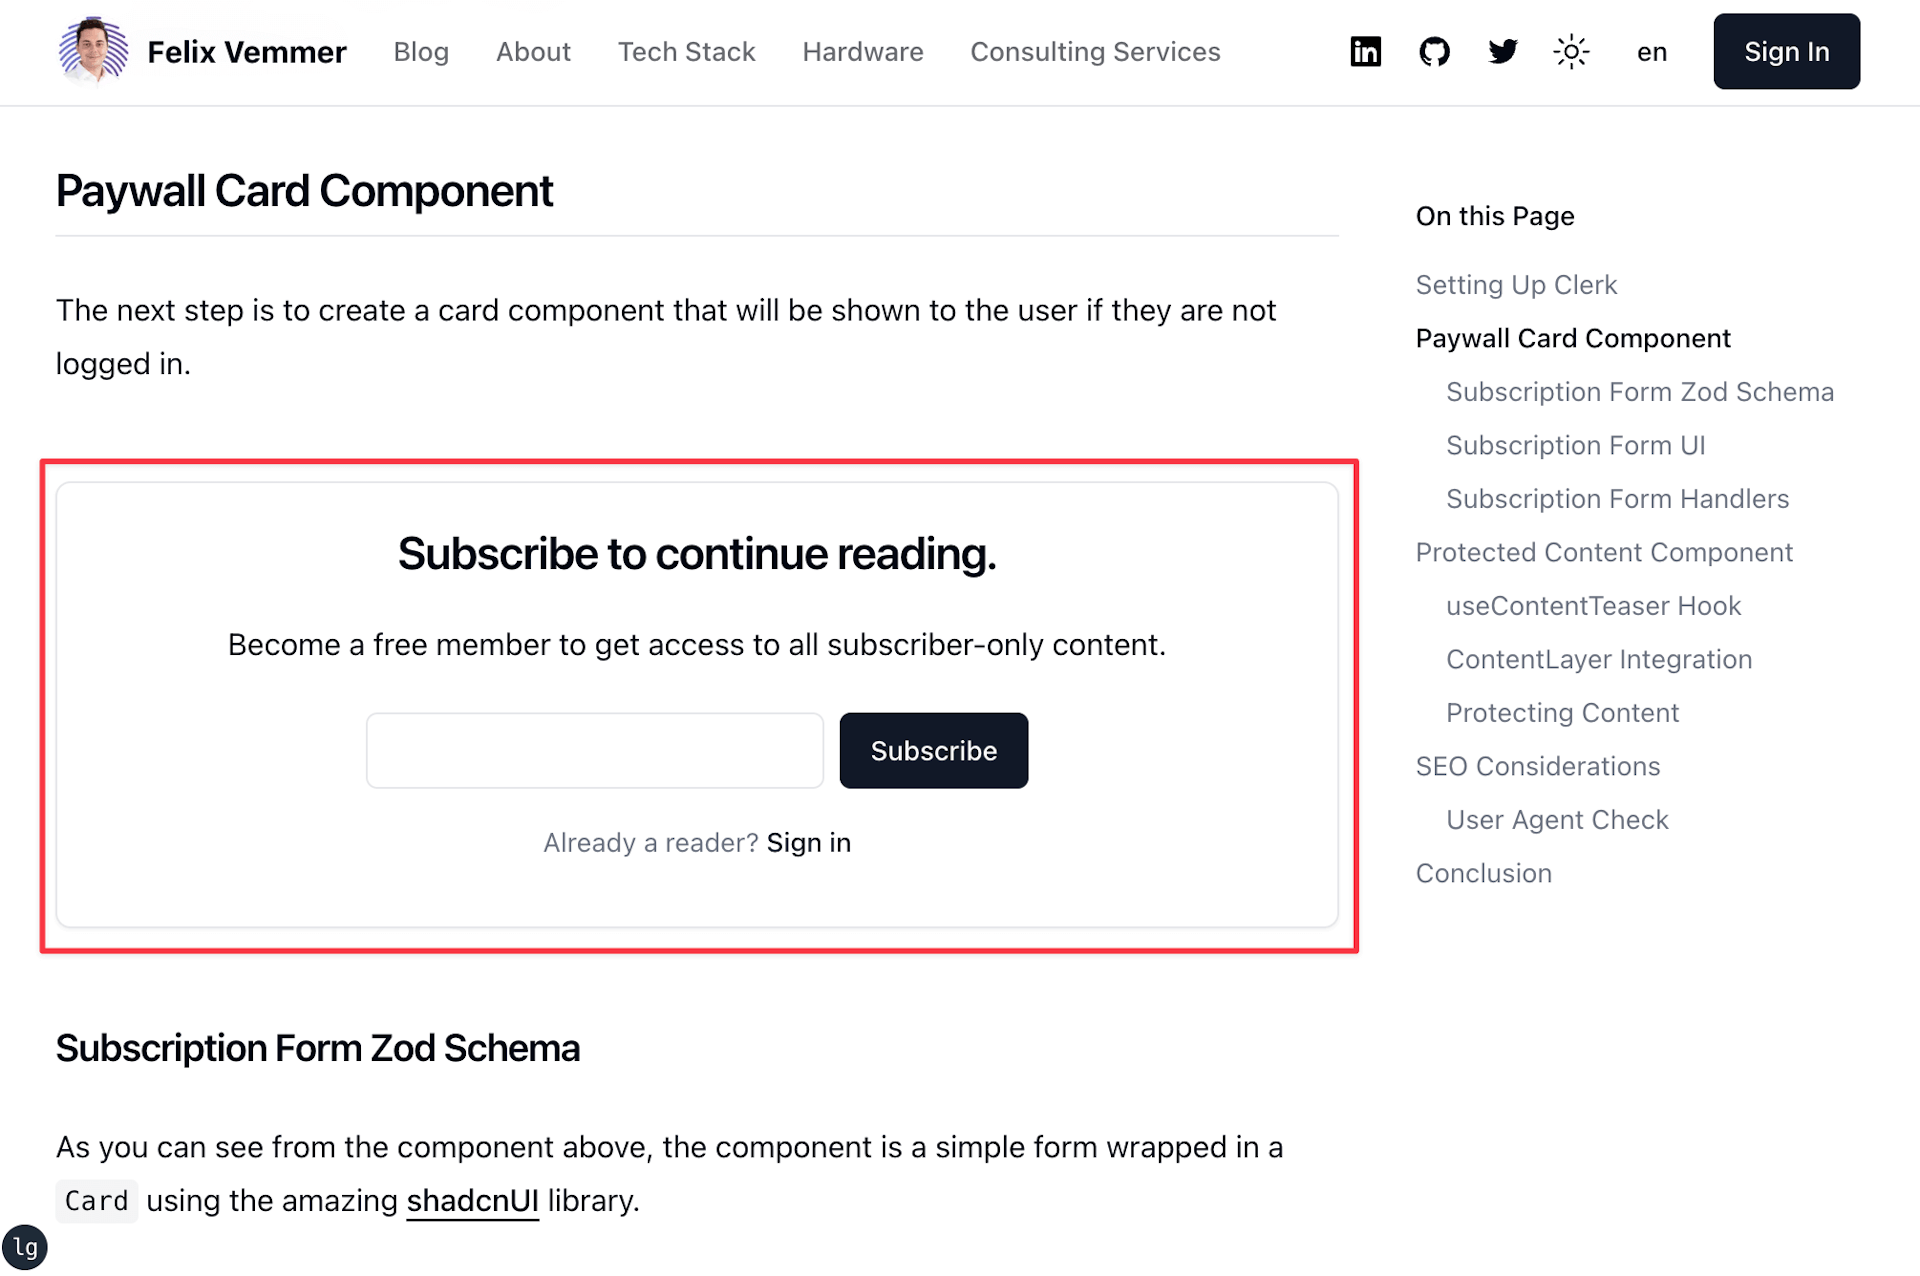
The subsequent step involves crafting a card component that will display to users who are not logged in.

<ProtectedContent>
Google should be able to index this.
</ProtectedContent>
Google indexing

Wrapping Up

This concludes the guide on how to create a subscription wall for your MDX blog using Clerk.

I hope this guide has been helpful to you. I'm eager to hear your feedback or see you as a new subscriber in my Clerk dashboard. For those interested in adding a guest book to their website, Brian has written an excellent post on integrating a guestbook using Clerk, Neon, and Netlify Functions.

If you're curious about how my blog subscribers are growing, follow me on X so you don't miss out.